Saturday, June 13, 2020

How to Embed a YouTube Video in Blogger?

How do you embed a video into Blogger?

In the article learn how to embed a YouTube video in blogger. Videos enhance your blog posts with new content. Embedding videos in your blog post is a great way to entertain and engage your readers. Do you want to embed YouTube videos in your posts on Blogger but have a hard time doing that? Don’t worry, this post’s got you covered. And the best part is, there are two methods to achieving this.

The first method is to share the video to Blogger. The other is to manually copy the video embed code to your Blogger HTML editor. In this post, I will show you how to use both methods on how to embed a youtube video in google blogger.

How do I embed a YouTube video in a blogger?

How to Share YouTube Video on Blogger?

You can easily share a YouTube video by clicking on the Share button just below the video. Doing so presents you with two choices;

How to Embed a YouTube Video in Blogger

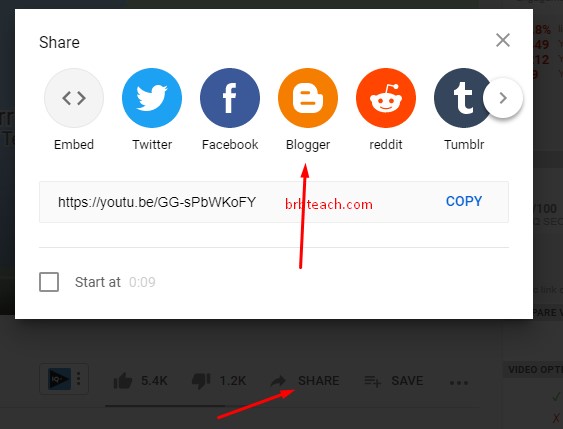
To share the video by clicking on the social media buttons. Since our focus here is to share the video on Blogger, all you need to do is click the button with the Blogger logo and hit the Publish button on the next popup window.

How to get more views on the Blogspot website?

Alternatively, you can share a video by copying the URL you see below the social media buttons and paste the same inside your Blogger post. See the screenshot below.

How to Embed YouTube Video on Blogger Post?

Head over to the YouTube video and copy the embed code of the video you want to display on your post and paste it into the HTML editor of your Blogger post. You can achieve this by following the steps below:

Step 1:

Search for the video you want to embed. On your browser, navigate to the YouTube video URL.

Step 2:

Click on the Share button which is just below the video and click Embed.

Step 3:

Copy the code which displays afterward.

Step 4:

Navigate to your Blogger text editor and click the HTML button and paste the code where you want it to appear on your blog post.

Step 5:

Click on Compose to get back to the default text editor. You should see a preview that looks like this:


Another Method:

The solution of How to Embed a YouTube Video in Blogger with the following steps below:

Step 1: Click insert Video

Step 2: Choose YouTube below and click Embed.

How to Embed a YouTube Video in Blogger

Step 3: Search Video and choose insert.

How to Embed a YouTube Video in Blogger

Step 4: You should see a preview that looks like this:

How to Embed a YouTube Video in Blogger

If you followed the steps diligently, kudos to you. You have successfully embedded a YouTube video on Blogger’s post.

I’d love to know your thoughts. Kindly drop your comments below. Should you have any problem with the guide, please let me know and I will make a more simplified video for it.

Share:

Wednesday, June 10, 2020

What are the Solutions of ATM Card is not Working?

Debit Card / Credit Card / ATM Card is Not working (what to do)?

Today, we discuss about Debit Card / Credit Card / ATM Card is not working problem. ATM Card is very important in our lives. Because we can take money from ATM anywhere or can shop online anywhere.

ATM / Debit Card / Credit Card moving is like a bank, which we can keep in our pocket and can be used anywhere when needed.

ATM Card is not Working

But sometimes it happens that we apply to your ATM / Debit Card ATM machine to get money and does not work card, or gives card error (ERROR) while paying online.

Read: How to make 1000$ Monthly with online work?

When this problem comes to you, you think that maybe the card has become blocked. You become very upset and do not understand what to do?

Today I will tell you some suggestions to resolve these problems that when your ATM Card is not Working then what do you do?

What are the common problems with ATM?

This problem usually comes out several times, because when we go to remove money from ATM machine, Card does not work after applying the card repeatedly. If the card is not working then generally these may be: You are putting the card’s pin wrong.

Invalid Card’s Error appears on applying the card in ATM machine several times. Many times your card ends the fixed limit, and do not pay attention to this.
After the card expiration, the card blocks and then you can not use it.

Remedy: What to do when the reason given above is received if Invalid PIN is getting the error, check your PIN password correctly in such a condition. If you did not pay attention to PIN Password and the pin password received with the card was changed.

New ATM Card Not Working:

So you contact the bank issuing bank branch. Invalid Card Error In this condition you have to pay attention whether you are putting the card in the right way or not.

Many times the cards put the card from the back side, thereby telling the machine card invalid.

One of the main reasons for the invalid card error can also be that the Magnet Strip available on the back side of your card has been rubbed.

ATM Card is not working

Many times we keep the card in our pocket (pocket), due to which the card turns between the middle and does not work and explains the machine invalid.

Even after doing all the kind efforts, the card error is getting more appropriate to contact the bank branch in this situation. To see the deadline of the card, Valid from the Valid From, Valid Thru will be checked in the upper part of your card.

In Valid Thru you have been given the month and year of the card to expire. Such as: Valid Thru 08/20. Here is the meaning of 08 months i.e. from August and 20 years i.e. 2020.

If the card time limit is expired, then the new card can be taken by contacting the bank branch by contacting the bank branch. And if your card is only given on the Valid from then it means that there is no limit to the end of the card until your card is not really bad, you can use it without any worries.

How to Fix Declined ATM Card ?

If your credit card is blocked then it may be that the fixed limit of your spending has expired. In this situation, even the bank can call the Customer Care number.

ATM Card is not Working

LEARN MORE ABOUT ATM CARD


But there should not be any information about the name, bank account, date of birth, etc. and neither he asks you about it. To maintain
maximum security, it is more appropriate to contact the bank branch directly.

Measure to keep ATM / Debit Card / Credit Card at ATM / Debit Card / Credit Card then we use but never pay attention to their security. Do not share information about your card with anyone online at any type of problem in the card and neither tell your card number.

What can i do if my ATM Card is not working?(Debit card, Credit Card)

Because no one can correct your card online. Contact only by bank branch. In the event of being bad, you have to write a letter from the name of a branch manager. And your card has to tell the problem. But never even share information from anyone in the password.

The card should never be kept in the pocket purse and should not be kept in the back pocket, because whenever we sit in a place, the most pressure is on purse.

And the risk of breaking and turning is happening. If you want to protect the card, use ATM / Debit Card / Credit Card Holder Purse or then use Steel Wallet.

I hope reading this post will help you to get a great deal and if you are forgetting to write something, you can keep your views in the comment box.

Share:

Saturday, June 6, 2020

How to Fix This Copy of Windows Is Not Genuine Error with Command Prompt?

Fix This Copy of Windows Is Not Genuine Error with Command Prompt?

When you turn on your windows, a black screen appears on your desktop and it displays the message This copy of windows is not genuine. With this error message, you cannot use the original copy of Windows. Maybe you have a feeling you may not be able to use your current copy of the Windows Operating System in the nearest future.

When you have installed a Windows Operating System, it gives a trail license to use and you must activate it before the trial period is over. Then have no fear, there is a fix for it. Yes, a quick and simple one at that.

Read Also: How to Activate Windows 10


Why does my computer say this copy of windows is not genuine?

If your Windows OS is an invalid or unauthorized copy, windows update automatically detected. When you update your windows operating system it shows “The copy of Windows is not genuine”. To resolve this problem normally uninstalled the latest windows update.

Using an unofficial or non-original version of Windows. You can prevent this by ensuring that you have an original Windows OS installed on your computer.

If you have automatic windows update enabled, then it finds your unauthorized and outdated windows and shows this message in every hour.

What happens if Windows 7/10 is not genuine?

If you are not using a genuine version of the Windows operating system, it shows a message every hour. (Notified: You are using non-genuine windows / Activate your windows). Your desktop background image became black. If you change the background image, it automatically became black in every hour.


How can I make my windows genuine?

You can directly click on the activate windows. Go to Start > Control Panel > System and Security > System > Windows Activation.

To activate your non-genuine windows purchase a license key for your windows version like windows 7, windows 8, windows 10 also.


Ok Let’s Fix “This Copy of Windows Is Not Genuine Error” with using Command Prompt

Stay with me while I walk you through a little trick that will get rid of the Windows is not genuine black screen in no time. Actually, there are other methods to fixing this error but today, we’re going to fix it with Windows Command Prompt.

The use of an outdated copy of Windows. If you keep Windows updated, the chances of getting this error are slim. So, ensure that you stay updated.

Fix This Copy of Windows Is Not Genuine Error

First Step:

Open Windows Command Prompt (CMD) as an Administrator. To do that, type CMD in the Start menu and then right-click on the CMD utility and select “Run as Administrator”. You should see a window that looks like this.

This Copy of Windows Is Not Genuine


Second Step:

Type the command slmgr -rearm and hit the Enter key on your keyboard. Be sure to insert the space between slmgr and the hyphen (-) in the command. The command above works on most computers but if it doesn’t do the trick on yours, then type slmgr/rearm or slmgr_rearm.

Step 3.

Press Enter and wait for a few seconds. A dialog box will display the message ‘Command Completed Successfully’.

Step 4.

Restart the computer system for the changes to take effect.


Read Also: How to Activate Microsoft Office 2016

Disclaimer: Following the steps in this guide does not convert a non-genuine Operating System to a genuine one. It only allows you to make use of a non-genuine OS without problems as long as you don’t update it. If you want complete Windows features and updates, you need to buy Genuine OS from trusted sellers.

Buy genuine Microsoft Windows here

I recommended using the genuine key from an online store and official website.

Have you tried the steps above, let us know in the comment section? Also, bookmark this page for further updates. And don’t forget to share this post!

Share:

Thursday, June 4, 2020

Free Download QFlash Tool Latest Version (2020)

Free Download QFlash Tool Latest Version (2020)

Free download QFlash Tool Latest Version. This QFlash Tool will help you to flash stock ROM on all Qualcomm based android smartphones. We provide the download link of the QFlash Tool.

New QFlash Tool added some new features. The new version support all Qualcomm based android smartphones and tablets and Windows versions also. New QFlash Tool supports XML files. Everyone can use it, it is really simple to use.

Download QFlash Tool

Requirements to use New QFlash Tool

Qualcomm Driver installed.

It can be run in windows 7, windows 8, and Windows 10.

Developed by Qualcomm INC.

Support all Qualcomm based chips.


Download QFlash Tool Latest Version

QFlash Tool v9.1.6 ZIP- Download

Share:

How to turn your pc to WiFi hotspot in Windows 10 /8 / 7

How to turn your PC to WiFi hotspot in Windows 10 /8 / 7

In this article learn how to turn your PC to WiFi Hotspot in Windows 10 or 7 in an easy way. We all know about how to join wireless networks with our computers. For most of us, the WiFi network is our basic mode of connection to the internet. But not so many can actually set up a WiFi Hotspot on their computers. That’s why I wrote this article. Here, I am going to show you a simple guide to setting that up on your Windows computer.

Read Also : How to Find WiFi Password Windows 10 / 7?

Before you learn how to turn PC to a wireless Hotspot

What is a Wireless Hotspot?

Wireless hotspot is a wireless access point that provides network or Internet access to other WiFi-enabled computing devices such as laptops or mobile phones. We can turn on Hotspot from the wireless-enabled devices, such as a laptop, iPod, or smartphone. Within wireless internet range, we get notified with available networks.

If you don’t get the “wireless networks are available” notification, you can go into your network settings to find available wireless networks.

You can then accept or initiate the connection to the hotspot’s wireless network, which is usually identified in the network name (SSID).

Note that SSID is simply the technical term for a network name and it. The full meaning of SSID is the Service Set Identifier.

Read Microsoft Official: Use your PC as a mobile hotspot

What Do You Need to Set Up A Wireless Hotspot?

The first requirement is your computer or laptop need to have a wireless network adaptor. (Wireless network card already installed on all laptop or PC devices.) if you don’t have an inbuilt network adapter, you must install it to turn on the hotspot.

Also ensure that you have your Windows firewall turned on (Windows has Firewall as an inbuilt feature, so all you need to do is just turn it on from Windows Control Panel).

How to turn your pc to WiFi hotspot in Windows 7

To turn on your pc to a wireless hotspot, follow these simple steps:

  • In the Windows 7 operating system:
  • Go to the Start menu at the taskbar.
  • Click the Control panel.
  • Go to Control Panel\Network and Internet\Network and Sharing Center.
  • Click on Set up a new network connection.
  • Click set up a wireless hotspot connection (PC to PC)
  • Click next.
  • Setup a wireless Adhoc network.
  • On the next window, click Next again.

How to turn your pc to WiFi hotspot

Now configure the hotspot and this will require the following the details:

  • Input Network name like BRBTEACH.
  • Choose security type like
  • Available options are No authentication(Open), WEP, WPA2-Personal.
  • Put your hotspot password.
  • Save this network button to continue.
  • Choose a network name and security options
  • Now that your hotspot is all set up, go ahead and connect a WiFi with your device.

How to turn your pc to WiFi hotspot in Windows 10

  • In right sidebar click on the WiFi icon.
  • You can see Mobile Hotspot icon (you can directly turn on this)
  • From control panel go to Network and internet setting
  • There you can see the mobile hotspot option on the left sidebar.
  • Now you can share your Hotspot with WiFi and Bluetooth.


How to turn your pc to WiFi hotspot

Do these articles help you solve this problem?

How to enable mobile hotspot in windows? can I make my laptop a wifi hotspot windows 7? laptop hotspot windows 10, wifi hotspot for windows 8, wifi hotspot for windows 10 free download, mobile hotspot windows 10 not working, windows 10 hotspot software.

Did you find this article helpful? Comment below and share it on social media with share buttons. Also, Subscribe to us on YouTube and follow us on Twitter.

Share:

How to Find WiFi Password Windows 10 / 7?

How to Find WiFi Password Windows 10?

If you want to connect the internet and you don’t know how to find WiFi password windows 10? Or maybe your computer connected to the internet but you didn’t remember the password. Nobody helps you to connect the internet on your mobile or other devices, here is the solution of how to find WiFi password windows 10.

Don’t worry, it’s quite simple to find the WiFi password, which you are currently connected to.

Read Also:  

How to find WiFi password?

I will tell you super-easy steps to find your WiFi password.


First Things First: Check Your Router’s Default Password

Before you consider any other means of finding your WiFi password, there is a basic step you have to take. That is, find the WiFi router you are connected to, examine it closely.

Usually, at the back of the router, you should see the sticker which contains the “SSID” and the “Network Key”. The “Network Key” you see is the default WiFi password.

If you can’t find the password printed on the back of the router, try looking at the manual or any other documentation that came with it.

But, you should also note that most Network Administrators do change the WiFi passwords from the default one to the one they assign to the router by themselves. This is usually done in a bid to restrict unauthorized access to the WiFi network.

Now another method to find,

How to find WiFi password on windows 10 2020

It’s worth noting that Windows saves the passwords of WiFi networks your computer connects to. By implication, you can also find the passwords of other WiFi networks your computer has been connected to before.

In this guide, I’m using Microsoft Windows 7 so this might be slightly different on other versions of Windows.

But not to worry, I will show Windows 8, 8.1 and 10 methods on last of this post for users of more recent Windows versions, so keep reading.


How to find your current WiFi network’s password using Windows 7?

Go to Navigate to Control Panel > Network and Internet > Network and Sharing Center and click on the Wireless Network Name.

On the next window that appears, click on Wireless Properties.

WiFi wireless properties

On clicking on Wireless Properties, a new window pops up with two tabs; “Connection” and “Security”.

Here, select “Security” and check the “Show characters” box to reveal the “Network security key”.

WiFi network security key.

The Network security key is your current WiFi network’s password.


Alternative Method:

There’s a shortcut to finding your WiFi network’s password on your Windows. This method requires the click of fewer buttons to get results.

  • Let’s get right into it.
  • Right-click the Network icon on the right of your taskbar.
  • Network icon
  • Then right-click the WiFi network name and select “Properties”.
  • On the next window, check the “Show characters” box to reveal the “Network security key”.
  • Network security key


How to find your current WiFi network’s password using Windows 8/10?

  • Click on the WiFi icon on the right sidebar.
  • Choose Network and Internet settings.
  • Click on status.
  • Choose the network and sharing center.
  • In network and sharing center choose connections, select a WiFi network.
  • In WiFi, status clicks Wireless properties.
  • Select the Security tab, Show the character’s checkbox.
  • Now you can easily view your WiFi password on windows 10.(image is shown below)


How to Find WiFi Password Windows 10

You can also view the WiFi password with Password viewer software like the WiFi password viewer. Now connect your mobile and other devices with an internet password.

Read Microsoft Official: Find your Wi-Fi network password in Windows

That was easy, right?

Now, give it a go and tell us your experience in the comments section.

Share:

King Tool Crack Free Download Latest Version 2020

King tool crack free download tools is a multi-device which permits repairing, flashing, unlocking FRP locks, break the passwords. King tool is developed for especially Samsung cell phones, it could also be utilized in t-mobile, MetroPCS, mobiles to remove the locks of mobile phone. Download king Tool Crack Free Download Latest Version from the given download link at the lowest of this page.

This new King flash tool is a flashing device that is a multi-tasking device for all Samsung Android phones. This device is used to restore and unlock FRP form all Samsung smartphones. If you want to unlock your Samsung cellular to get the brand new version of the king tool download King Tool Crack Free Download Latest Version and easily flash your mobile phone.

King Tool Crack Free Download Features:

  • King tool allows unlocking.
  • Superfast unlock and Repairing.
  • FRP Lock Bypass HTC, Samsung.
  • Lenovo FRP Remove also.
  • Huawei FRP bypass.
  • MTK IMEI Repair.
  • Enable Diag Mode
  • Anyone can click to unlock.
  • Fix write QCN Samsung.
  • Repair IMEIS.

King Tool Crack Free Download

How to use a King Tool Crack?

King Tool Crack uses methods within some simple setups.

  • Download the king Tool Crack from the given link below.
  • Extract file with a zip archiver.
  • install the King Tool Crack.
  • open King Tool Crack tool on your computer.
  • Power off your mobile.
  • Select your mobile brand in King Tool Crack.
  • Power on your mobile.
  • Press Start and wait a minute.
  • Done.

It supports all Samsung s series, a series, j series, grand prime, core prime, and Samsung note models.

Download King Tools Latest Setup File

Share:

Wednesday, May 27, 2020

How do I fix Google Play store no Internet connection?

How do I fix Google Play store no Internet connection?

This problem regularly comes when you don’t have the latest Android apps and shows google play store no internet connection.

Read also How to Fix Unfortunately Google play store services has been stop

To fix google play store no connection Ensure wi-fi or cell information is became on or restart again, retry errors message even though your WIFI/3G/LTE connection is operating smoothly and all of the other net apps are walking high-quality.

How do I fix Google Play store no Internet connection on Android Phones?

When I get this trouble on my mobile phone, I had no idea my all google play services along with Gmail, play movies, song, magazines stop working.

I attempted to apply a specific wifi connection, VPN’s, modified DNS servers, restarted my android cellphone, router but still it show my google play store no internet connection.

Google Play Store No Connection

Then in the end, after hours of the conflict, I got here up with the solution which help me to solve this no internet connection problem.

Before you start
No internet connection make sure wifi or cellular data is turned on the play store.


7 Solution to fix Google Play store no Internet connection?

1. Check your date and time setting

Google play services sync with their master servers to ship and acquire facts, to do this your tool time and date must be efficaciously set. It really works 😯 % of the time.

To solve this issue:

  • Visit settings > date & time
  • Check computerized date & time
    or as a substitute, you can set time with the aid of your self, just make certain it is accurate.

2. Clean google play keep app cache

Sometimes it reasons troubles and will be one of the reasons behind google play store cache data. Before doing this please backup your google data password also.

To solve this issue:

  • Visit settings > app
  • Swipe right to all
  • Scroll down and tap google play STORE.
  • press clean statistics button and faucet good enough.

3. Exchange DNS settings of your phone or network router

Sometimes ISP DNS servers can’t clear up domains of google play services.
So that, you won’t switch to google DNS servers from wifi settings of your phone.

It may also be performed through your internet router.

To solve this issue:

  • Go to settings
  • Choose wifi network (hold tap)
  • Pick out adjust
  • Show superior settings.
  • Then from the IP settings drop box, exchange DHCP to static and enter the details cited in the picture below.

dns1 have to be 8.8.8.8
dns2 have to be 8.8.4.4

4. Re-login your Google account

You can change the safety settings or password of your google account.

You need to update the account settings for your Android tool. Also, you can transfer to different account.

To solve this issue:

  • Go to settings >
  • Account
  • Google
  • Tap your number one google account
  • Open options from right top,
  • click REMOVE account.
  • now open play save
  • it’ll ask you to log in your google account once more.

5. Uninstalling Updates:

Sometimes it works by uninstalling updates
Google play store updates routinely and makes modifications without person permission.

If the above referred to steps don’t help you, use the “uninstall updates” alternative of play store app. It may fix Google Play store no Internet connection

To solve this issue:

  • Go to google play app settings.
  • Press uninstall updates


6. Put off any proxy or VPN software

Delete any current proxy or VPN services and join at once to the internet earlier than gaining access to play keep.
Visit wi-fi & community, regulate your wifi settings, visit superior alternatives and remove any proxy servers.

Disconnect any VPN connection or apps you have got jogging in historical past.

Erase HOSTS Record
In the event that you established your Android gadget, do the accompanying.

To solve this issue:

  • Open-File manager.
  • Open root/framework/system and so on.
  • Erase hosts.txt document

7. Reset Phone or Tablet

In the event that anything said above does not work. It’s an ideal opportunity to complete a full processing plant reset to your phone.

It will clear everything and put your gadget in its unique condition. Ensure you back-up your contacts and documents before you play out a reset, else you will lose everything.

To solve this issue:

  • Go to Settings
  • Click Backup and reset
  • Click Rest.

That’s it if have any problem comment below I will help you.

Share:

Sunday, May 24, 2020

Windows explorer has stopped working cannot open anything

Windows explorer has stopped working cannot open anything

Windows explorer has stopped working cannot open anything whilst installing or uninstalling software program packages downloading and installing software on Windows 7/8/10. When copying files windows explorer stooped working and can’t click anything.

What is the causes of windows explorer has stoped working error?

Microsoft regularly recommended to update your windows for security reasons. Some of the outdated software, antivirus or malware effected your system and they stop working.

Another reason behind it outdated drivers. Corrupted device drivers cause this error.

Update drivers in Windows 10

If you recently download and install any program or software, it also can be a reason.

Sometimes windows crash, and blue screen appears, but this problem is only application crash, error message display like this:

“Windows Explorer has stopped working.”

“Windows Installer has stopped working.”

windows explorer has stopped working

Ok Let’s start:

if you recently format and install windows or operating system, then the check you have latest drivers and software update versions.

Fix Windows Explorer has Stopped Working Can’t Click Anything

Solution 1:
• Go to start.
• Type CMD, Right-click and run as an administrator press enter.
• At the command prompt, type chkdsk/r/f
• Press enter
• Reboot your Laptop or PC

Solution 2:
• Go to start.
• Type “Regedit” and run as administrator.
• Look for the following registry key: “HKEY_LOCAL_MACHINESOFTWAREMicrosoftSQMClientWindowsDisabledSessions”
• On window right pane, delete the sub-key: “Machine Throttling”
• Reboot your Laptop or PC

Solution 3:
Scan your computer with any trusted antivirus.

Solution 4:
Remove unwanted and third party software and services which recently install and corrupted.

Conclusion:

Windows Explorer has stopped working” is common problem for windows users. We face this problems lots of time. We find the the solution and share with you, if you find helpful, don’t forget to share others.

Was this article helpful for you?

Let’s comment below your problem, and Give suggestion this the only way we can improve.

Share:

Unfortunately Google Play Services has Stopped Working Solution 2020

How to fix Unfortunately Google Play Services has Stopped Error?

We will fix, Unfortunately Google Play services has stopped error. Android is the most popular OS (Operating System) worldwide today. We can see that the on Android devices. Google play services have stopped and not opening.


 The following are the methods that have proven to be able to get rid of the “Unfortunately, (app name) has stopped” issue


Unfortunately google play services has stopped fix 

*********************Method 1 *************
Do you Know Play store can’t be removed unless root access is granted? 

If you have root access, just properly install the proper apps.

Apps are all Google product apps that are preloaded into a single package for that phone. (They must be installed in recovery.)

Note
If you do not have root access, do a full factory reset.

For those of you that this does not apply too and your phone was never rooted and is doing this at random, and a factory reset does not work you need to flash a new file to your phone. Some viruses that corrupt the stock ROM image so the user could not factory reset to get rid of the said virus.

Read also:

How to Activate Microsoft Office Using Kmspico (Microsoft Word Online)?

Unfortunately google play services has stopped after factory reset

*****************Method 2 ************
In method 2 try this method to solve this problem

1. First, remove the battery.

2. Then remove the sd card.
3. Again put the battery back in the phone.
4. Turn on the phone.
5. Reset the phone
6. Wait till the phone is fully reset
7. Remove battery
8. Put the sd card back in the phone
9. Put the battery back in the phone
10. Turn on the phone.

And that should do it. the downside is that you might lose some apps you downloaded unless they were on your sd card.

Search term:
unfortunately app has stopped in android emulator

unfortunately app has stopped the android studio
unfortunately app has stopped android development
unfortunately has stopped google play
android, unfortunately, the process com.google.process.gapps has stopped
unfortunately app center has stopped
unfortunately google app has stopped fix

For Latest free unlock trick visit my new Video

https://youtu.be/R-MUTwNvQrQ

How to Unlock Bootloader


Reset pattern of iPhone


How to Root Any Samsung Mobile Easily?

For more update subscribe our youtube channel and keep visiting…

-~-~~-~~~-~~-~-

Share: